
-
Prep Time10 minutes (per flavour)
-
Cook Time-
-
Serving16
-
Serv Size1/2 cup
This colourful little dessert was born out of a spontaneous experiment during one hot December in Nagercoil. I was seven months pregnant at the time, and we were heading over to my aunt’s place for our Christmas lunch. Despite the season, the weather felt anything but wintry (or maybe it was just me!), and all I could think about was how heavenly a chilled bowl of jelly and vanilla ice cream would taste after a heavy meal. But since it was Christmas, regular jelly just didn’t feel special enough, and that’s when this idea struck me.
It was my first time attempting something like this, and I had a stash of 5–6 jelly flavours we had brought back with us from the UK, so I decided to play around with layers and colours. The result? A striking rainbow jelly that surprised everyone at the table. No one had imagined jelly could be made this way, and the familiar jelly-with-ice-cream combo felt instantly elevated. While I’ve made it a couple of times since, it’s not become a regular recipe (mainly because I’ve come to realize that this only works well with some brands of jelly, but I still remember the joy of creating it, especially in that season of waiting and wonder.
Ingredients
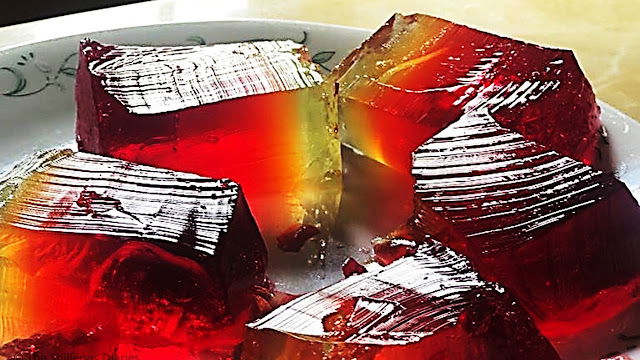
Rainbow Jelly
Directions
Creating this rainbow jelly does take a little patience, but the process is just as satisfying as the final reveal. With each colourful layer, you’re building not just a dessert, but a moment of delight. If you’re using multiple flavours like I did, make sure to plan your layering sequence in advance, and give each layer enough time to chill and set before adding the next. Trust me, it’s worth the effort when you finally turn it out and see those perfect, wobbly stripes!
Prepare the first layer: Start by preparing the first jelly flavour according to the instructions on the packaging. Stir in the sugar until fully dissolved. Allow the mixture to cool slightly, but don’t let it start setting.
Set the base layer: Lightly grease a large glass bowl with a bit of oil (this helps when turning it out later), then pour in the first jelly mixture. Refrigerate until fully set.
Add the second layer: Prepare the second flavour while the first one sets. Once it’s cooled and the first layer is firm, gently pour the next jelly mixture over the set layer. Return to the fridge to chill and set.
Repeat with remaining layers: Continue the process for each remaining flavour, preparing, cooling, pouring, and setting, until all layers are complete. Once the final layer is added, refrigerate the entire bowl for at least 2 hours or until fully set (Setting time may vary based on the brand used).
Turn it out: To unmold, briefly dip the bottom of the bowl in a pan of hot water to loosen the edges. Gently invert onto a serving plate.
Serve and enjoy: If you’d rather not turn it out, you can slice the jelly into colourful cubes and serve them as-is, perfect with a scoop of vanilla ice cream on the side!
Conclusion
This dessert isn’t something I make all the time, but when I do, it always brings a sense of fun to the table. The playful colours, the soft wobble of jelly, and the creamy contrast of vanilla ice cream make it a nostalgic crowd-pleaser, especially for special occasions. It’s a little bit of effort, a whole lot of joy, and the perfect way to turn something simple into something unforgettable.


Leave a Review