-
Prep Time15 minutes
-
Cook Time40 minutes
-
Serving12
-
Serv Size1 piece
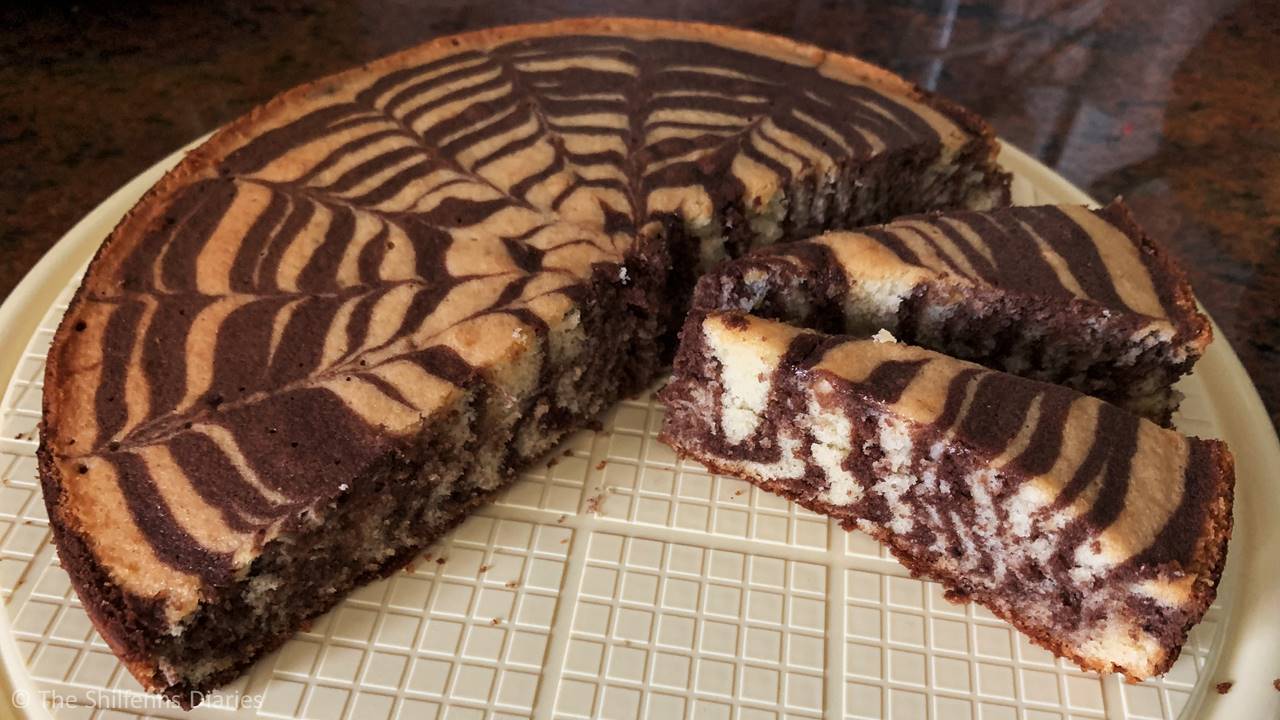
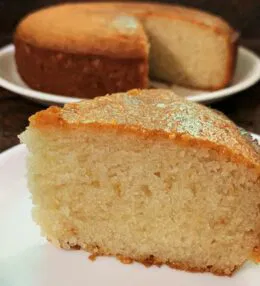
I was in the mood to try something new when I remembered one of my close friends baking a Zebra Cake a couple of years ago. It looked so striking with its beautiful striped pattern, and I couldn’t resist giving it a go myself. Of course, it does take a bit of patience to get the layers right, but it’s not rocket science! Just a little careful pouring and you’re good to go! I stuck to the classic vanilla-and-chocolate combination to keep it simple, using my mom’s trusty butter cake recipe as the base.
The best part about making this cake is the reaction when you cut into it. My kids thought it was the most interesting cake they’d seen, and honestly, that made the effort worth it. Flavor-wise, it’s just like a regular butter cake: soft, moist, and delicious, but what makes it shine is the mesmerizing zebra-like stripes inside. It works equally well as a fun family bake or as a showstopper on the table for a special occasion.
Ingredients
For the Plain Stripes:
For the Dark Stripes:
Directions
Now that you’ve got your ingredients ready, it’s time for the fun part (or should we call it the patience-testing part 😛): layering those beautiful stripes! The steps may look detailed, but once you get into the rhythm, it’s really just a matter of alternating spoonfuls of batter. A little patience will reward you with a cake that’s as impressive to look at as it is delicious to eat.
Prepare the Plain Batter: In a mixing bowl, beat the eggs together with the vanilla essence until they turn light, airy, and fluffy.
Cream Butter and Sugar: In a separate large mixing bowl, cream the butter and sugar until pale and smooth. Add in the beaten eggs and gently fold through until just combined. (Be careful not to overmix, as this can make the cake dense.)
Sift the Dry Ingredients: Sift the flour and baking powder together. If making the chocolate batter, add cocoa powder at this stage.
Combine Wet and Dry: Gradually fold the flour mixture into the egg-butter-sugar mixture until everything is just incorporated into a smooth batter.
Adjust the Consistency: The batter should drizzle easily off a spoon. If it feels too thick, stir in a couple of tablespoons of milk, adding up to ¼ cup per batter if needed (Remember that adding too much milk will make the cake denser, so only add as much as you need).
Prepare the Chocolate Batter: Repeat the same process to prepare a second batch, this time mixing in cocoa powder for the chocolate portion.
Grease the Pan: Grease an 8-inch round pan with butter, making sure the base and sides are well coated so the cake releases easily after baking.
Start Layering the Batter: Spoon one ladle of plain batter into the center of the pan. Give the pan a gentle tap so the batter spreads slightly.
Alternate with Chocolate Batter: Next, spoon a ladle of chocolate batter directly into the center of the plain layer. Keep alternating between the two batters, always pouring into the middle so the layers spread outward in rings.
Continue Until Done: Repeat the layering process until all the batter has been used. (This part takes patience — expect to spend around 15-20 minutes building those stripes 😛.)
Bake the Cake: Preheat the oven to 360°F (Gas Mark 4). Bake for 35–45 minutes, or until a wooden skewer inserted into the center comes out clean.
Cool and Slice: Allow the cake to cool in the pan for 10 minutes before transferring to a wire rack. Once cooled, slice through to reveal the striking zebra stripes inside.
Conclusion
And there you have it — your very own Zebra Cake! With its striking chocolate and vanilla stripes, it’s sure to turn heads the moment you slice into it. The best part is that beneath the pretty pattern, you still get the same soft, buttery texture of a classic cake, just with a little extra flair. Serve it plain with tea or dress it up with a drizzle of chocolate sauce for dessert. It’s bound to be a crowd-pleaser either way.

Leave a Review